
So, ever since we got married, and especially after we started having kids, I have become obsessed with preserving these memories, specifically saving pictures. I love the option of having all of my pictures across all of my apple devices, so I use the cloud to store all of them (I ESPECIALLY recommend this if you’re someone who loses/breaks their phone regularly– enter: my husband), but the problem with this is you need to pay for that storage. The good news is that it’s not incredibly expensive- apple offers a $1, $3 and $10 per month options, but I’m only 7 years in to owning an iPhone and already am about at my limit for the $3 per month option. I was in desperate need for a more sustainable solution!
One thing I started doing after we got married was making photo books. I go through an entire year and do all my favorite memories, include captions and dates, fun and not so fun life events, and publish it in a shutterfly photo book. I actually just got a notification that my 2019 photo book was just delivered and I’m so excited to go check my mailbox and get it. This is so much fun to look back on the years and see how we’ve changed in a very simple and streamlined way,… but more on that some other time 🙂
So, you want to backup your photos. You have a couple options, and I’ve tried every single one of these.
- Back up photos of the year to a CD
This originally was a great idea, since I could easily just put that CD in the back of the yearly photo book, and everything was in the same place! Downsides: there’s a limited amount of space available. This option worked just swimmingly until we had kids. Just an example of how different our photo storage was when we had kids: I was able to put all our pictures from an entire year on one CD. Then, we had my first in late August- I could put all our pictures from January-middle of August on one CD, and then we needed TWO FULL CDs to store the pictures from the end of August until December. If you are a serious photo taker, or if you take any videos, this is not an option that will work for you. If you don’t take a ton of pictures, and life the simple, flat version of storage, then go for it! - Back up photos of the year to a USB drive
Again, originally a great idea, but I started running into the same problems! As our daughter got older and started doing cuter things, therefore producing more videos, I started running out of storage on these as well! On to the next idea - Back up photos of the year to an external hard drive
By far, the best idea yet. Lots of storage! I use this hard drive from Amazon- seems to be working fairly well, has A TON of storage, haven’t had any major issues with it, although when I eventually run out of storage on this one, I will probably be investing in this option, as I’ve heard it’s faster and it has really good reviews, and this is not a place for me to skimp on quality. These are the entirety of my family’s pictures, I am not about to leave this to a game of chance. Since buying my external hard drive, I’ve managed to back up all our pictures from when I originally got an iPhone in 2012 until now, and I’m pretty sure I still have storage left.
About this time, I started to get super anal retentive about how my pictures were being stored. I LOVED the apple photos application, and wanted to use that to browse and view pictures, plus I absolutely adore watching those live pictures that iPhones capture, but if I just exported them and added them to the hard drive like a regular picture, that live function is gone. So, I was on a major search to figure out how to create a second photos application on the external hard drive, completely separate from the one on my phone/computer. I didn’t want to disable or delete the one that I was currently using, because I still wanted to keep current and favorite pictures on there, so I was in quite a pickle. I did TONS of searching, and it seems that no one was able to tell me how to do this, but I did find articles describing how to do some of the parts of the mission I was trying to complete. So here’s the entire step-by-step version of how to still use the apple photos application to browse and edit the pictures and videos.
Step 1: Plug in external hard drive.
you might need to reformat the external hard drive a bit so you can add/delete stuff on it like you would a normal USB drive. Here’s a link that will describe how to do this. If that doesn’t work, let me know in the comments below, or DM me on instagram, and I will try to figure out what’s going on.
Step 2: Set up a secondary photos library
You need to hold down the options key and then click the photos icon to open up the photos application. Instead of popping up like normal, a small window will open up asking which library you want to open. Click the “create new” button at the bottom.

Now, it’ll pop up your finder-type window, and it’s asking where you want this secondary photos library to be, and what you want it to be named. Have it be located on your external hard drive, and name it whatever you want. I did “Backup Photos”
Step 3: Start exporting photos
This is very easy, but there are a few very important details to remember while you’re doing this. Start by selecting the photos you want to transfer to the external hard drive.

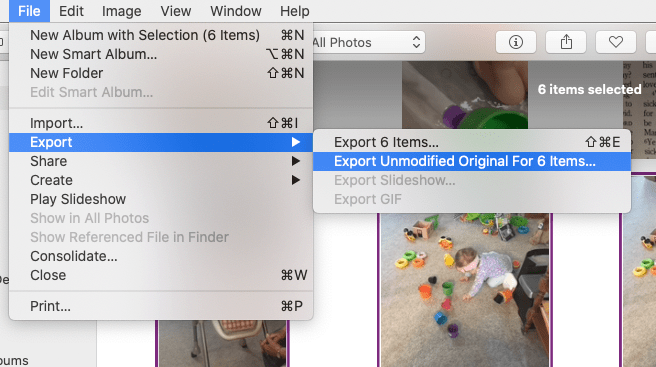
Then go to File–export–export unmodified original for X items
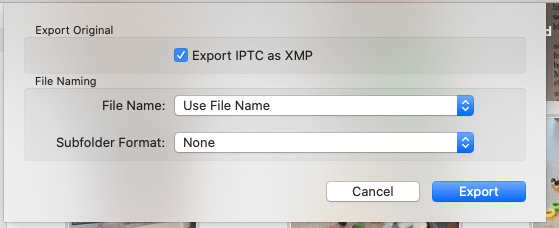
Keep that top box checked, and click export
Last is to select the location you want this pictures to be exported to. It is VERY important that you select the external hard drive as your location. This will not work if you export the photos to any other place. (I’m using an old college USB to do this, so that’s why it says “K College”, but make sure you click that external location). I would highly recommend making a new folder for each batch of pictures you export/import. It will save you a ton of time when you go to import them so you don’t have to wade through a bunch of pictures to select the ones you want. Plus it’ll save your hard drive some extra work from retrieving pictures and showing them to you, only for you to say “no thanks, I don’t want to import those ones again”

Halfway there! It might take a while to export these photos, especially if you have a lot of them, and if your external hard drive is a little slow (another reason why I’m excited to check out that Samsung hard drive once my current one is filled up)
Now, you just need to import these pictures to the photos application. Close out of photos, open up the backup photos library, (if you still had photos open, it will ask you if you want to switch library. Click yes).
Go to File-Import- and select those pictures that you want to import. Click “review for import” and there will be a window that pops up about importing new items, and you can click yes. Obviously you probably don’t want to import items you’ve already imported. Click Import, and then wait, again. Sometimes if I have a huge batch of items to export/import, I will just let it go while I go about my day, or even at night. I’ve just let it import while I sleep before, but I wouldn’t exactly say this is the best idea, since your computer will be up and running all night.
And there you have it! You have your pictures uploaded, your videos uploaded, they’re all in chronological order (when you click the “unmodified” version for export, it will remember the date, location, and a ton of other stuff), and you can now add tags to the pictures. I like to do this, and will add tags on a bunch of different stuff, like “Piper” “pigtails” “outside” “cute” “smiling” “puppy” so when I want to find this picture later, I just type a couple of those words into the search bar at the top and there ya go! I will warn you it takes quite a while to do this, especially if you’re doing this for years of pictures at once, but my goal from here on out is to backup pictures at least once a month so I only have a small batch to do at once. I also like to add locations to my pictures, but I’m still working on the details of this, because some of the features in the photos app aren’t totally working for me yet. So I would hold off on adding locations to the pictures that don’t already have locations, and I will update this post if I figure out a way for this to work 100% of the time.
Also, another side note is that iPhones do not save locations and dates of pictures that you took through a different app, like snapchat or instagram. So you’ll have to keep that in mind if you like to take pictures through the instagram app, and want to have the location saved for the pictures- you’ll have to add this to your photo later, and it becomes quite a pain in the bum to do this for heaps of pictures.
When you’re done, make sure you eject the hard drive properly by clicking the eject button in the finder window. You’ll have to make sure you quite the photos application first, and sometimes it’ll take a minute, but this is very important for your hard drive’s health. I would always tell my students when I was a teacher “do you want to be knocked upside the head with a frying pan when you need to go to sleep? no! Don’t do that with your computer! Don’t force shut down or unexpectedly eject anything until it’s absolutely necessary”
And there you have it! I hope this post helps you be able to backup your memories, and maybe helps you sleep a little sounder at night knowing that no matter what happens, your photos are safe and sound where no hacker or internet crash can destroy them.
